iRules Editor & Declarative Development with Visual Studio Code
The windows iRule Editor has had a very long life. But...it hasn't been updated in years and really should be sunsetted in your environment. There have been other attempts along the way, from a personal project with a Mac desktop app written in python and Qt that never made it past me, an Eclipse plugin several years back that gained a little traction, but the iRule Editor Joe Pruitt created lived on through all of that. However, there are a couple fantastic options now in the Visual Studio Code marketplace that combine to make for a great iRules development environment and also include the ability to pursue the automation toolchain development as well. Here are the tools you'll need: Visual Studio Code F5 Networks iRules (for iRules command completion and syntax highlighting) The F5 Extension (for session management and soooo much more) ACC Chariot (for converting config from UCS upload to AS3) John Wagnon and I had Ben Gordon on our DevCentral Connects live stream a couple times to highlight the functionality, which as mentioned goes far beyond just iRules. 15KViews6likes1Comment
Send Client HTTP Request to Pool And Send HTTP Response From BIG-IP to Client.
Good day everyone. We are starting a F5 XC POV and I'm currently focused on external logging to Graylog. XC is sending log messages via HTTPS to a BIG-IP VIP. Graylog doesn't support HTTP JSON messages. However we've configured a Raw/Plaintext TCP input and it is processing received messages great with the help of some pipeline rules. Graylog however isn't sending any HTTP response, which I understand why but that is what I'm trying to see if I can overcome. I am seeing XC repeatedly sending the same log messages. I'm assuming because it never receives a HTTP 200 response. Seems like reasonable behavior. So XC is sending messages properly and Graylog is consuming them properly. Because there isn't any option I can see to get Graylog to generate a HTTP response I am exploring options to get the BIG-IP to send the response with an iRule. I read to the following doc: https://clouddocs.f5.com/api/irules/HTTP__respond.html Snip from that: Generates a response to the client as if it came from the server. If the command runs on the client side, it sends the response to the client without any load balancing taking place. If the command runs on the server side, the content from the actual server is discarded and replaced with the information provided. I am hanging my hopes on getting the bold comment working. But I don't know if this requires a server-side response to behave properly. I started with following iRule: when HTTP_REQUEST_SEND { serverside { HTTP::respond 200 -version 1.1 noserver } } I'm POST'ing some JSON via cURL I've seen sent from XC. I see the log message in Graylog without the iRule in place and cURL eventually times out expected. When I put the above iRule in place and execute the same cURL test I get a HTTP 200 response from the BIG-IP however I don't see the log message in Graylog. I've verified with a server-side packet capture on the BIG-IP the HTTP post is never sent to Graylog. This obviously explains why I don't see it in Graylog. I've tried several variants of the above iRule. For example, I tried the clientside context even though the documentation clearly states I should get the behavior I'm seeing. I tried putting the HTTP::respond in different events, HTTP_RESPONSE for example. But I am not able to find the correct approach to get the BIG-IP to send the HTTP POST to Graylog and send the HTTP 200 to the client. I'm hoping someone is able to either confirm this is even possible or provide some guidance to get the BIG-IP to send the HTTP POST to Graylog and send the HTTP 200 to the client. Thank you kindly in advance.41Views0likes1CommentiRules Style Guide
This article (formatted here in collaboration with and from the notes of F5er Jim_Deucker) features an opinionated way to write iRules, which is an extension to the Tcl language. Tcl has its own style guide for reference, as do other languages like my personal favorite python. From the latter, Guido van Rossum quotes Ralph Waldo Emerson: "A foolish consistency is the hobgoblin of little minds..," or if you prefer, Morpheus from the Matrix: "What you must learn is that these rules are no different than the rules of a computer system. Some of them can be bent. Others can be broken." The point? This is a guide, and if there is a good reason to break a rule...by all means break it! Editor Settings Setting a standard is good for many reasons. It's easier to share code amongst colleagues, peers, or the larger community when code is consistent and professional looking. Settings for some tools are provided below, but if you're using other tools, here's the goal: indent 4 spaces (no tab characters) 100-column goal for line length (120 if you must) but avoid line continuations where possible file parameters ASCII Unix linefeeds (\n) trailing whitespace trimmed from the end of each line file ends with a linefeed Visual Studio Code If you aren't using VSCode, why the heck not? This tool is amazing, and with the F5 Networks iRules extension coupled with The F5 Extension, you get the functionality of a powerful editor along with the connectivity control of your F5 hosts. With code diagnostics and auto formatting based on this very guide, the F5 Networks iRules Extension will make your life easy. Seriously...stop reading and go set up VSCode now. EditorConfig For those with different tastes in text editing using an editor that supports EditorConfig: # 4 space indentation [*.{irule,irul}] indent_style = space indent_size = 4 end_of_line = lf insert_final_newline = true charset = ascii trim_trailing_whitespace = true Vim I'm a vi guy with sys-admin work, but I prefer a full-fledge IDE for development efforts. If you prefer the file editor, however, we've got you covered with these Vim settings: # in ~/.vimrc file set tabstop=4 set shiftwidth=4 set expandtab set fileencoding=ascii set fileformat=unix Sublime There are a couple tools for sublime, but all of them are a bit dated and might require some work to bring them up to speed. Unless you're already a Sublime apologist, I'd choose one of the other two options above. sublime-f5-irules (bitwisecook fork, billchurch origin) for editing Sublime Highlight for export to RTF/HTML Guidance Watch out for smart-quotes and non-breaking spaces inserted by applications like Microsoft Word as they can silently break code. The VSCode extension will highlight these occurrences and offer a fix automatically, so again, jump on that bandwagon! A single iRule has a 64KB limit. If you're reaching that limit it might be time to question your life choices, I mean, the wisdom of the solution. Break out your iRules into functional blocks. Try to separate (where possible) security from app functionality from stats from protocol nuances from mgmt access, etc. For example, when the DevCentral team managed the DevCentral servers and infrastructure, we had 13 iRules to handle maintenance pages, masking application error codes and data, inserting scripts for analytics, managing vanity links and other structural rewrites to name a few. With this strategy, priorities for your events are definitely your friend. Standardize on "{" placement at the end of a line and not the following line, this causes the least problems across all the BIG-IP versions. # ### THIS ### if { thing } { script } else { other_script } # ### NOT THIS ### if { thing } { script } else { other_script } 4-character indent carried into nested values as well, like in switch. # ### THIS ### switch -- ${thing} { "opt1" { command } default { command } } Comments (as image for this one to preserve line numbers) Always comment at the same indent-level as the code (lines 1, 4, 9-10) Avoid end-of-line comments (line 11) Always hash-space a comment (lines 1, 4, 9-10) Leave out the space when commenting out code (line 2) switch statements cannot have comments inline with options (line 6) Avoid multiple commands on a single line. # ### THIS ### set host [getfield [HTTP::host] 1] set port [getfield [HTTP::host] 2] # ### NOT THIS ### set host [getfield [HTTP::host] 1]; set port [getfield [HTTP::host] 2] Avoid single-line if statements, even for debug logs. # ### THIS ### if { ${debug} } { log local0. "a thing happened...." } # ### NOT THIS ### if { ${debug} } { log local0. "a thing happened..."} Even though Tcl allows a horrific number of ways to communicate truthiness, Always express or store state as 0 or 1 # ### THIS ### set f 0 set t 1 if { ${f} && ${t} } { ... } # ### NOT THIS ### # Valid false values set f_values "n no f fal fals false of off" # Valid true values set t_values "y ye yes t tr tru true on" # Set a single valid, but unpreferred, state set f [lindex ${f_values} [expr {int(rand()*[llength ${f_values}])}]] set t [lindex ${t_values} [expr {int(rand()*[llength ${t_values}])}]] if { ${f} && ${t} } { ... } Always use Tcl standard || and && boolean operators over the F5 special and and or operators in expressions, and use parentheses when you have multiple arguments to be explicitly clear on operations. # ### THIS ### if { ${state_active} && ${level_gold} } { if { (${state} == "IL") || (${state} == "MO") } { pool gold_pool } } # ### NOT THIS ### if { ${state_active} and ${level_gold} } { if { ${state} eq "IL" or ${state} eq "MO" } { pool gold_pool } } Always put a space between a closing curly bracket and an opening one. # ### THIS ### if { ${foo} } { log local0.info "something" } # ### NOT THIS ### if { ${foo} }{ log local0.info "something" } Always wrap expressions in curly brackets to avoid double expansion. (Check out a deep dive on the byte code between the two approaches shown in the picture below) # ### THIS ### set result [expr {3 * 4}] # ### NOT THIS ### set result [expr 3 * 4] Always use space separation around variables in expressions such as if statements or expr calls. Always wrap your variables in curly brackets when referencing them as well. # ### THIS ### if { ${host} } { # ### NOT THIS ### if { $host } { Terminate options on commands like switch and table with "--" to avoid argument injection if if you're 100% sure you don't need them. The VSCode iRules extension will throw diagnostics for this. SeeK15650046 for more details on the security exposure. # ### THIS ### switch -- [whereis [IP::client_addr] country] { "US" { table delete -subtable states -- ${state} } } # ### NOT THIS ### switch [whereis [IP::client_addr] country] { "US" { table delete -subtable states ${state} } } Always use a priority on an event, even if you're 100% sure you don't need them. The default is 500 so use that if you have no other starting point. Always put a timeout and/or lifetime on table contents. Make sure you really need the table space before settling on that solution, and consider abusing the static:: namespace instead. Avoid unexpected scope creep with static:: and table variables by assigning prefixes. Lacking a prefix means if multiple rules set or use the variable changing them becomes a race condition on load or rule update. when RULE_INIT priority 500 { # ### THIS ### set static::appname_confvar 1 # ### NOT THIS ### set static::confvar 1 } Avoid using static:: for things like debug configurations, it's a leading cause of unintentional log storms and performance hits. If you have to use them for a provable performance reason follow the prefix naming rule. # ### THIS ### when CLIENT_ACCEPTED priority 500 { set debug 1 } when HTTP_REQUEST priority 500 { if { ${debug} } { log local0.debug "some debug message" } } # ### NOT THIS ### when RULE_INIT priority 500 { set static::debug 1 } when HTTP_REQUEST priority 500 { if { ${static::debug} } { log local0.debug "some debug message" } } Comments are fine and encouraged, but don't leave commented-out code in the final version. Wrapping up that guidance with a final iRule putting it all into practice: when HTTP_REQUEST priority 500 { # block level comments with leading space #command commented out if { ${a} } { command } if { !${a} } { command } elseif { ${b} > 2 || ${c} < 3 } { command } else { command } switch -- ${b} { "thing1" - "thing2" { # thing1 and thing2 business reason } "thing3" { # something else } default { # default branch } } # make precedence explicit with parentheses set d [expr { (3 + ${c} ) / 4 }] foreach { f } ${e} { # always braces around the lists } foreach { g h i } { j k l m n o p q r } { # so the lists are easy to add to } for { set i 0 } { ${i} < 10 } { incr i } { # clarity of each parameter is good } } What standards do you follow for your iRules coding styles? Drop a comment below!6.5KViews22likes12Comments
Converting a BIG-IP Maintenance Page iRule to Distributed Cloud using App Stack
If you are familiar with BIG-IP, you are probably also familiar with its flexible and robust iRule functionality. In fact, I would argue that iRules makes BIG-IP the swiss-army knife that it is. If there is ever a need for advanced traffic manipulation, you can usually come up with an iRule to solve the problem. F5 Distributed Cloud (XC) has its own suite of tools to help in this regard. If you need to do some sort of traffic manipulation/routing you can usually handle that with Service Policies or simply using Routes. Even with these features, however, there are going to be some cases where iRule functionality from the BIG-IP cannot be reproduced directly in XC. When this happens, we switch to using App Stack, which is XC’s version of a swiss army knife. In this article, I wanted to walk through an example of how you can leverage XC's App Stack for a specific iRule conversion use case: Displaying a Custom Maintenance Page when all pool members are down. For reference, here is the iRule: when LB_FAILED { if { [active_members [LB::server pool]] == 0 } { if { ([string tolower [HTTP::host]] contains "example.com")} { if { [HTTP::uri] ends_with "SystemMaintenance.jpg" } { HTTP::respond 200 content [ifile get "SystemMaintenance.jpg"] "Content-Type" "image/jpg" } else { HTTP::respond 200 content "<!DOCTYPE html> <html lang="en"> <head> <title>System Maintenance</title> <style type="text/css"> .base { font-family: 'Tahoma'; font-size: large; } </style> </head> <body> <br> <center><img alt="sad" height="200" src="SystemMaintenance.jpg" width="200" /></center><br> <center><span class="base">This application is currently under system maintenance.</span></center> <br> <center><span class="base">All services will be back online in a few mintues.</span> </body> </html>" } } } } When dissecting this iRule, you can see we have to solve for the following: Trigger the maintenance page when all pool members are down Serve local files (images, css, etc.) Display the static HTML page So, how do we do this? Well, App Stack allows us to deploy and host a container in Distributed Cloud. So we can easily create a simple container (using NGINX for bonus points!) that contains all these images, stylesheets, HTML files, etc. and manipulate our pools so that it uses this container when required! Let’s deep dive into the step-by-step process… Step by Step Walk-through: Container Creation First, we have to create our container. I'm not going to go too deep into how to create a container in this article, but I will highlight the main steps I took. To start, I simply extracted the HTML from the iRule above and saved all the required files (images, stylesheets, etc.) in one directory. Since I am adding NGINX to the container, I must also create and include a nginx.conf file in this directory. Below was my configuration: worker_processes 1; error_log /var/log/nginx/error.log warn; pid /tmp/nginx.pid; events { worker_connections 1024; } http { client_body_temp_path /tmp/client_temp; proxy_temp_path /tmp/proxy_temp_path; fastcgi_temp_path /tmp/fastcgi_temp; uwsgi_temp_path /tmp/uwsgi_temp; scgi_temp_path /tmp/scgi_temp; include /etc/nginx/mime.types; server { listen 8080; location / { root /usr/share/nginx/html/; index index.html; } location ~* \.(js|jpg|png|css)$ { root /usr/share/nginx/html/; } } sendfile on; keepalive_timeout 65; } There really isn’t much to the NGINX configuration for this example, but keep in mind that you can expand on this and make it much more robust for other use cases. (One note about the configuration above is that you will see /tmp paths mentioned. These are required since our container will run as a non-root user. For more information, see the NGINX documentation here: https://hub.docker.com/_/nginx) Finally, I included a Dockerfile with my requirements for NGINX and exposing port 8080. Once that was all set, I built my container and pushed it Docker Hub as a private repository. App Stack Deployment Now that we have the container created and uploaded to Docker Hub, we are ready to bring it to XC. Start by opening up the F5 XC Console and navigate to the Distributed Apps tile. Navigate to Applications -> Container Registries, then click Add Container Registry. Here we just have to add a name for the Container Registry, our Docker Hub Username, “docker.io” for the Server FQDN, and then blindfold our password for Docker Hub. After saving, we are now ready to configure our workload To do so, we have to navigate over to Applications -> Virtual K8s. I already had a Virtual Site and Virtual K8s created, but you'll need to create those if you don't already have them. For your reference, here are some links to a walk-through on each of these: Virtual Site Creation:https://docs.cloud.f5.com/docs/how-to/fleets-vsites/create-virtual-site Virtual K8s Creation:https://docs.cloud.f5.com/docs/how-to/app-management/create-vk8s-obj Select your Virtual K8s cluster: After selecting your cluster, navigate to theWorkloads tab.Under Workloads, click on Add VK8s Workload. Give your workload a name and then change the Type of Workload toService instead of Simple Service. Your configuration should look something like below: You'll notice we now have to configure the Service. ClickConfigure. The first step is to tell XC which container we want to deploy for this service. Under Containers, select Add Item: Give the container a name, and then input your Image Name. The format for the image name is "registry/image:tagname". If you leave the tag name blank, it defaults to “latest”. Under the Select Container Registry drop down, selectPrivate Registry. This will bring up another drop-down where we will select the container registry we created earlier. Your configuration should end up looking similar to below: For this simple use case, we can skip the Configuration Parameters and move to our Deploy Options. Here, we have some flexibility on where we want to deploy our workload. You can choose All Regional Edges (F5 PoPs), specific REs, or even custom CEs and Virtual Sites. In my basic example, I chose Regional Edge Sites and picked the ny8-nyc RE for now: Next, we have to configure where we want to advertise this workload. We have the option to keep it internal and only advertise in the vK8s Cluster or we could advertise this workload directly on the Internet. Since we only want this maintenance page to be seen when the pool members are all down, we are going to keep this to Advertise In Cluster. After selecting the advertisement, we have to configure our Port Information. Click Configure. Under the advertisement configuration, you’ll see we are simply choosing our ports. If you toggle “Show Advanced fields” you can see we have some flexibility on the port we want to advertise and the actual target port for the container. In my case, I am going to use 8080 for both, but you may want to have a different combination (i.e. 80:8080). Click Apply once finished. Now that we have the ports defined, we can simply hit Apply on the Service configuration and Save and Exit the workload to kick off the deployment. We should now see our new maintenance-page workload in the list. You’ll notice that after refreshing a couple times, the Running/Completed Pods and Total Pods fields will be populated with the number of REs/CEs you chose to deploy the workload to. After a few minutes, you should have a matching number of Running/Completed Pods to your Total Pods. This gives us an indication that the workload is ready to be used for our application. (Note: you can click on the pod numbers in this list to see a more detailed status of the pods. This helps when troubleshooting) Pool Creation With our workload live and advertised in the cluster, it is time to create our pool. In the top left of the platform we’ll need to Select Service and change to Mulitcloud App Connect: Under Mulit-Cloud App Connect, navigate to Manage -> Load Balancers -> Origin Pools and SelectAdd Origin Pool. Here, we’ll give our origin pool a name and then go directly to Origin Servers. Under Origin Servers, clickAdd Item. Change the Type of the Origin Server to be K8s Service Name of Origin Server on given Sites. Under Service Name, we have to use the format "servicename.namespace:cluster-id" to point to our workload. In my case, it was "maintenance-page.bohanson:bohanson-test" since I had the following: Service Name: maintenance-page Namespace: bo-hanson VK8s Cluster: bohanson-test Under Site or Virtual Site, I chose the Virtual Site I already had created. The last step is to change the network to vK8s Networks on Site and Click Apply. The result should look like the below: We now need to change our Origin Server port to be the port we defined in the workload advertisement configuration. In my case, I chose port 8080. The rest of the configuration of the origin server is up to you, but I chose to include a simple http health check to monitor the service. Once the configuration finished, click Save and Exit. The final pool configuration should look like this: Application Deployment: With our maintenance container up and running and our pool all set, it is time to finally deploy our solution. In this case, we can select any existing Load Balancer configuration where we want to add the maintenance page. You could also create a new Load Balancer from scratch, of course, but for this example I am deploying to an existing configuration. Under Manage -> Load Balancers, find the load balancer of your choosing and then select Manage Configuration. Once in the Load Balancer view, select Edit Configuration in the top right. To deploy the solution, we just need to navigate to our Origins section and add our new maintenance pool. SelectAdd Item. At this point, you may be thinking, “Well that is great, but how am I going to get the pool to only show when all other pool members are down?” That is the beauty of the F5 Distributed Cloud pool configuration. We have two options that we can set when adding a pool: Weight and Priority. Both of those options are pretty self-explanatory if you have used a load balancer before, but what is interesting here is when you give these options a value of zero. Giving a pool a weight of zero would disable the pool. For a maintenance pool use case, that could be helpful since we can manually go into the Load Balancer configuration during a maintenance window, disable the main pool, and then bring up the maintenance pool until our change window is closed when we could then reverse the weights and bring the main pool back online. That ALMOST solves our iRule use case, but it would be manual. Alternatively, we can give a pool a Priority of zero. Doing so would mean that all other pools take priority and will be used unless they go down. In the event of the main pool going down, it would default to the lowest priority pool (zero). Now that is more like it! This means we can set our maintenance pool to a Priority of zero and it will automatically be used when the health of all our other pool members go down – which completely fulfills the original iRule requirement. So in our configuration, let's add our new maintenance pool and set: Weight: 1 Priority: 0 After clicking save, the final pool configuration should look something like this: Testing To test, we can simply switch our health check on the main pool to something that would fail. In my case, I just changed the expected status code on the health check to something arbitrary that I knew would fail, but this could be different in your case. After changing the health check, we can navigate to our application in a browser, and see our maintenance page dynamically appear! Changing the health check on the main pool back to a working one should dynamically turn off the maintenance page as well: Summary This is just one example of how you can use App Stack to convert some more advanced/dynamic iRules over to F5 Distributed Cloud. I only used a basic NGINX configuration in this example, but you can start to see how leveraging NGINX in App Stack can give us even more flexibility. Hopefully this helps!98Views1like0Comments
ASM Policy in "Blocking" Mode switch to "Transparent" for some IP's
I have a policy that I need to switch to blocking but the business want to have a phased approach. Only the testing team should be in Blocking, while the rest of the business (a different IP range) remains in transparent. I need to keep the same policy so that I can "proof" that everything is running fine. Is there a method to do that ? Was thinking about an iRule but dont know how. I know how to disable ASM with an iRule but, that's something I don't want because I need to keep the learning suggestions. Bye St.402Views0likes6CommentsF5 WAF/ASM block users that trigger too many violations by source ip/device id using the correlation logs
Hello to All, I was thinking of using the iRule tables command to write when a user ip/device id makes too many violations for a time perioud and to get blocked for some time but I see that the F5 ASM has correlation logs that trigger incidents but there is not a lot info if this can be used in iRules or to block user ip addresses / deviceid. https://support.f5.com/csp/article/K92532922Solved1.6KViews1like7Comments
Big-IP Next 20.2.0-2.375.1+0.0.43 iRule count problem
I have very simple iRule to show the problem: when HTTP_REQUEST { set Client_IP [IP::client_addr] if { ($Client_IP starts_with "x.x.x.x") && ([HTTP::uri] equals "/seed") } { table set -subtable TABLE "key1" "value1" 30 table set -subtable TABLE "key2" "value2" 15 table set -subtable TABLE "key3" "value3" 45 HTTP::respond 200 content "Done" TCP::close return } set key_value "key1" set key_value2 "key2" set key_value3 "key3" set count [table keys -subtable TABLE -count] HTTP::respond 200 content " Remaining timeout / defined timeout for ${key_value} => [table lookup -notouch -subtable TABLE ${key_value}] [table timeout -subtable TABLE -remaining ${key_value}]/[table timeout -subtable TABLE ${key_value}] Remaining timeout / defined timeout for ${key_value2} => [table lookup -notouch -subtable TABLE ${key_value2}] [table timeout -subtable TABLE -remaining ${key_value2}]/[table timeout -subtable TABLE ${key_value2}] Remaining timeout / defined timeout for ${key_value3} => [table lookup -notouch -subtable TABLE ${key_value3}] [table timeout -subtable TABLE -remaining ${key_value3}]/[table timeout -subtable TABLE ${key_value3}] Count TABLE ${count}" } It looks like table -keys -subtable <tablename> -count don't work properly: Remaining timeout / defined timeout for key1 => value1 27/30 Remaining timeout / defined timeout for key2 => value2 12/15 Remaining timeout / defined timeout for key3 => value3 42/45 Count TABLE 0 My expected output would be 3 (as it is not timeouted), not 0. Can someone check if I am correct? Or tell me how I can count not expired entries in table.112Views0likes4CommentsUri-based client cert authentication question
Hi, I need to configure a virtual server with selective client cert authentication based on URI. In case user select cert auth the uri changes to /myweb/secure/, F5 should request client cert, renegotiate SSL and insert client cert into HTTP header so the back-end server can read client cert. There is quite a lot of info and posts about this feature, which I've readed. I've config VS, SSL profile (client) and irule but I just can't make this work. SSL profile client: renegotiation enabled client authentication client certificate: ignore frequency: once trusted certificate authorities & advertised cert: bundle of client cert CA irule: when CLIENTSSL_CLIENTCERT { HTTP::release if { [SSL::cert count] < 1 } { reject } } when HTTP_REQUEST { if { [HTTP::uri] starts_with "/myweb/secure/" } { if { [SSL::cert count] == 0 } { HTTP::collect SSL::authenticate always SSL::authenticate depth 9 SSL::cert mode require SSL::renegotiate } } } when HTTP_REQUEST_SEND { clientside { if { [SSL::cert count] > 0 } { HTTP::header insert "x-clientcert" [X509::whole [SSL::cert 0]] } } } I'm not sure whether /myweb/secure/ path is ever accesible, since there is no browser pop-up requesting the client certificate. I really can't figure this out, any hints would be most appreciated. Thanks a lot for your time and help.182Views0likes1CommentFingerprinting TLS Clients with JA4 on F5 BIG-IP
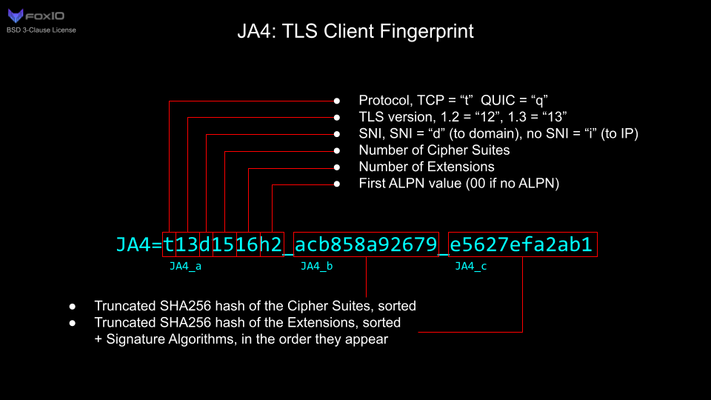
JA4+ is a set of simple network fingerprints thatare both human and machine readable to facilitate more effective threat-hunting and analysis. In this article you will learn how you can use F5 iRules to gerenate JA4 TLS fingerprints.2.4KViews10likes0Comments