Mitigating Application Threats with BIG-IP Next WAF
Overview of BIG-IP Next In today's modern world where the digital landscape is continuously evolving and security threats are becoming more sophisticated, the need for a robust and adaptive security solution is essential. BIG-IP Next is a next-generation solution which is setting a new standard for safeguarding your digital assets, protecting your applications, and empowering enterprises with the highest security efficacy.BIG-IP Next is the modernized solution optimized to simplify operations, enhance performance, and strengthen security. As per the official website, BIG-IP Next simplifies day-to-day ADC operations and accelerates application time-to-market through automation so that you can focus more on getting your apps online. BIG-IP Next’s modern, highly scalable software architecture is designed for maximum resiliency to support vast, dynamic application portfolios and their most complex traffic management and security policies, ensuring that applications are always available to end users. BIG-IP Next also provides deep insights into your application health, network performance, traffic patterns, and security threats to improve business decision-making. For a quick overview of BIG-IP Next and how the next-generation attributes can help you with your existing or new deployments, check out the video below. Here are some of the key capabilities that you can checkout and learn how you can mitigate app threats and security complexity with BIG-IP Next WAF: 1. Deploy HTTPS application with WAF Protection The first step in protecting your applications starts with onboarding your application in BIG-IP Next instance and creating a WAF security policy as per application requirements. Finally creating load balancers and applying the above-created WAF policies. Next, users can monitor the application traffic by navigating to their respective security dashboards and take necessary steps as per security insights. For more details, see this video. 2. Create and Manage Security Policies Sometimes creating security policies can be a time-consuming job, and BIG-IP Next has made this user-friendly for creating and managing security policies from a centralized UI. Users can create, delete or update their existing policies in fewer steps and can apply them directly to the applications, thereby decreasing the application delivery time to market. You can check out the video below for more details. 3. Create Security Policies using Templates One more advantage of BIG-IP Next is the support for creating security policies using templates and it’s just a one-click action using 'F5 BIG-IP Next’. Users can make use of default templates and protect their applications with zero effort, for ex. Using the Violation Rating Template. For more information, check below video. 4. Security Policy Migration Going through existing BIG-IP security policies and then creating the same ones in BIG-IP Next solution can be time-consuming. This is made easy so that users can migrate their security policy from 'F5 Advanced WAF' to 'F5 BIG-IP Next WAF' in a simple manner. With fewer steps, you can have your entire WAF security posture up without going through the rough step of creating them from scratch. Please refer to the video below for more insights. 5. Signatures and Threat Campaigns Update Regular update of attack signatures and threat campaigns is a vital step in safeguarding your applications against the latest attacks. This process is super easy using ‘F5 BIG-IP Next’ so that applications can mitigate them without the need for downtime. For step-by-step procedure to update signatures and threat campaigns, please check the video below. You can also check out the demo link below for detailed insights of how BIG-IP Next WAF enables the migration of apps and policies between BIG-IP TMOS and BIG-IP Next. The demo also shows how to deploy new web applications with WAF security policies included within BIG-IP Next Central Manager and finally how to analyze and respond to security incidents within the Next WAF dashboard. Reference links What is BIG-IP Next? | DevCentral Getting Started with BIG-IP Next: Fundamentals | DevCentral https://www.f5.com/products/big-ip-services/big-ip-next 65Views0likes0Comments
Deploy WAF on any Edge with F5 Distributed Cloud (SaaS Console, Automation)
F5 XC WAAP/WAF presents a clear advantage over classical WAAP/WAFs in that it can be deployed on a variety of environments without loss of functionality. In this first article of a series, we present an overview of the main deployment options for XC WAAP while follow-on articles will dive deeper into the details of the deployment procedures.5.3KViews9likes0CommentsEnhance your Application Security using Client-side signals – Part 2
Elevate your web and mobile application security with F5's innovative integration of web proxy strategies and client-side signals in this two-part series. Dive into the three critical categories of client-side signals—human interaction, device environment, and network signals—to enhance your application security strategy. Gain practical insights on distinguishing between humans and bots, fingerprinting devices, and analyzing network signals, ensuring robust protection for your online applications.114Views1like0CommentsSMTP Smugglers Blues
The SMTP protocol has been vulnerable to email smuggling for decades. Many of the mail servers out there have mitigations in place to handle this vulnerability but not all of them, especially the quick libraries and add-ons you can find on web sites. Protecting your server from these attacks is simple with F5 BIG-IP Advanced WAF and our SMTP Protocol Security profiles. Read to learn how to give those bad actors the “Smugglers Blues”195Views2likes2CommentsCookie Tampering Protection using F5 Distributed Cloud Platform
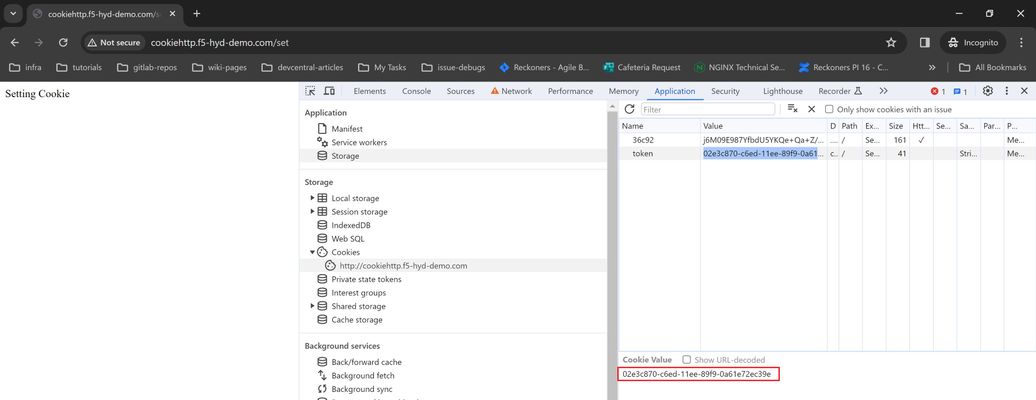
This article aims to cover the basics of cookies and then showed how intruders can tamper cookies to modify application behavior. Finally, we also showcased how F5 XC cookie tampering protection can be used to safeguard our sensitive cookie workloads.183Views1like0CommentsMitigating OWASP API Security Top 10 risks using F5 NGINX App Protect
This 2019 API Security article covers the summary of OWASP API Security Top 10 – 2019 categories and newly published 2023 API security article covered introductory part of newest edition of OWASP API Security Top 10 risks – 2023. We will deep-dive into some of those common risks and how we can protect our applications against these vulnerabilities using F5 NGINX App Protect. Excessive Data Exposure Problem Statement: As shown below in one of the demo application API’s, Personal Identifiable Information (PII) data, like Credit Card Numbers (CCN) and U.S. Social Security Numbers (SSN), are visible in responses that are highly sensitive. So, we must hide these details to prevent personal data exploits. Solution: To prevent this vulnerability, we will use the DataGuard feature in NGINX App Protect, which validates all response data for sensitive details and will either mask the data or block those requests, as per the configured settings. First, we will configure DataGuard to mask the PII data as shown below and will apply this configuration. Next, if we resend the same request, we can see that the CCN/SSN numbers are masked, thereby preventing data breaches. If needed, we can update configurations to block this vulnerability after which all incoming requests for this endpoint will be blocked. If you open the security log and filter with this support ID, we can see that the request is either blocked or PII data is masked, as per the DataGuard configuration applied in the above section. Injection Problem Statement: Customer login pages without secure coding practices may have flaws. Intruders could use those flaws to exploit credential validation using different types of injections, like SQLi, command injections, etc. In our demo application, we have found an exploit which allows us to bypass credential validation using SQL injection (by using username as “' OR true --” and any password), thereby getting administrative access, as below: Solution: NGINX App Protect has a database of signatures that match this type of SQLi attacks. By configuring the WAF policy in blocking mode, NGINX App Protect can identify and block this attack, as shown below. If you check in the security log with this support ID, we can see that request is blocked because of SQL injection risk, as below. Insufficient Logging & Monitoring Problem Statement: Appropriate logging and monitoring solutions play a pivotal role in identifying attacks and also in finding the root cause for any security issues. Without these solutions, applications are fully exposed to attackers and SecOps is completely blind to identifying details of users and resources being accessed. Solution: NGINX provides different options to track logging details of applications for end-to-end visibility of every request both from a security and performance perspective. Users can change configurations as per their requirements and can also configure different logging mechanisms with different levels. Check the links below for more details on logging: https://www.nginx.com/blog/logging-upstream-nginx-traffic-cdn77/ https://www.nginx.com/blog/modsecurity-logging-and-debugging/ https://www.nginx.com/blog/using-nginx-logging-for-application-performance-monitoring/ https://docs.nginx.com/nginx/admin-guide/monitoring/logging/ https://docs.nginx.com/nginx-app-protect-waf/logging-overview/logs-overview/ Unrestricted Access to Sensitive Business Flows Problem Statement: By using the power of automation tools, attackers can now break through tough levels of protection. The inefficiency of APIs to detect automated bot tools not only causes business loss, but it can also adversely impact the services for genuine users of an application. Solution: NGINX App Protect has the best-in-class bot detection technology and can detect and label automation tools in different categories, like trusted, untrusted, and unknown. Depending on the appropriate configurations applied in the policy, requests generated from these tools are either blocked or alerted. Below is an example that shows how requests generated from the Postman automation tool are getting blocked. By filtering the security log with this support-id, we can see that the request is blocked because of an untrusted bot. Lack of Resources & Rate Limiting Problem Statement: APIs do not have any restrictions on the size or number of resources that can be requested by the end user. Above mentioned scenarios sometimes lead to poor API server performance, Denial of Service (DoS), and brute force attacks. Solution: NGINX App Protect provides different ways to rate limit the requests as per user requirements. A simple rate limiting use case configuration is able to block requests after reaching the limit, which is demonstrated below. Conclusion: In short, this article covered some common API vulnerabilities and shows how NGINX App Protect can be used as a mitigation solution to prevent these OWASP API security risks. Related resources for more information or to get started: F5 NGINX App Protect OWASP API Security Top 10 2019 OWASP API Security Top 10 20232.2KViews7likes0CommentsSupport of WAF Signature Staging in F5 Distributed Cloud (XC)
Introduction: Attack signatures are the rules and patterns which identifies attacks against your web application. When the Load balancer in the F5Distributed Cloud (XC)console receives a client request, it compares the request to the attack signatures associated with your WAF policy and detects if the pattern is matched. Hence, it will trigger an "attack signature detected" violation and will either alarm or block based on the enforcement mode of your WAF policy. A generic WAF policy would include only the attack signatures needed to protect your application. If too many are included, you waste resources on keeping up with signatures that you don't need. Same way, if you don't include enough, you might let an attack compromise your application. F5 XC WAF is supporting multiple states of attack signatures like enable, disable, suppress, auto-supress and staging. This article focusses on how F5 XC WAF supports staging and detects the staged attack signatures and gives the details of attack signatures by allowing them into the application. Staging: A request that triggers a staged signature will not cause the request to be blocked,but you will see signature trigger details in the security event. When a new/updated attack signature(s) is automatically placed in staging then you won't know how that attack signature is going to affect your application until you had some time to test it first. After you test the new signature(s), then you can take them out of staging, apply respective event action to protect your application! Environment: F5 Distributed Cloud Console Security Dashboard Configuration: Here is the step-by-step process of configuring the WAF Staging Signatures and validating them with new and updated signature attacks. Login to F5 Distributed Cloud Console and navigate to “Web App & API Protection” -> App Firewall and then click on `Add App Firewall`. Name the App Firewall Policy and configure it with given values. Navigate to “Web App & API Protection” à Load Balancers à HTTP Load Balancers and click on `Add HTTP Load Balancers`. Name the Load Balancer and Configure it with given values and associate the origin pool. Origin pool ``petstore-op`` configuration. Associate the initially created APP firewall ``waf-sig-staging`` under LB WAF configuration section. ``Save and Exit`` the configuration and Verify that the Load balancer has created successfully with the name ``petstore-op``. Validation: To verify the staging attacks, you need the signature attacks listed in attack signature DB. In this demo we are using the below newly added attack signature (200104860) and updated attack signature (200103281) Id’s. Now, Let’s try to access the LB domain with the updated attack signature Id i.e 200103281 and verify that the LB dashboard has detected the staged attack signature by reflecting the details. F5 XC Dashboard Event Log: Now try to access the LB domain with new signature attack adding the cookie in the request header. F5 XC Dashboard Event Log: Now, Disable the staging in WAF policy ``waf-sig-staging``. Let’s try to access the LB domain with new signature attack. F5 XC Dashboard Event Log: Conclusion: As you see from the demo, F5 XC WAF supports staging feature which will enhance the testing scope of newly added and updated attack signature(s). Reference: F5 Distributed Cloud WAF Attack Signatures955Views5likes2CommentsSecuring Applications using mTLS Supported by F5 Distributed Cloud
Introduction Mutual Transport Layer Security (mTLS) is a process that establishes encrypted and secure TLS connection between the parties and ensures both parties use X.509 digital certificates to authenticate each other. It helps to prevent the malicious third-party attacks which will imitate the genuine applications.This authentication method helps when a server needs to ensure the authenticity and validity of either a specific user or device.As the SSL became outdated several companies like Skype, Cloudfare are now using mTLS to secure business servers. Not using TLS or other encryption tools without secure authentication leads to ‘man in the middle attacks.’ Using mTLS we can provide an identity to a server that can be cryptographically verified and makes your resources more flexible. mTLS with XFCC Header Not only supporting the mTLS process, F5 Distributed Cloud WAF is giving the feasibility to forward the Client certificate attributes (subject, issuer, root CA etc..) to origin server via x-forwarded-client-cert header which provides additional level of security when the origin server ensures to authenticate the client by receiving multiple requests from different clients. This XFCC header contains the following attributes by supporting multiple load balancer types like HTTPS with Automatic Certificate and HTTPS with Custom Certificate. Cert Chain Subject URI DNS How to Configure mTLS In this Demo we are using httpbin as an origin server which is associated through F5 XC Load Balancer. Here is the procedure to deploy the httpbin application, creating the custom certificates and step-by-step process of configuring mTLS with different LB (Load Balancer) types using F5 XC. Deploying HttpBin Application Here is the link to deploy the application using docker commands. Signing server/leaf cert with locally created Root CA Commands to generate CA Key and Cert: openssl genrsa -out root-key.pem 4096 openssl req -new -x509 -days 3650 -key root-key.pem -out root-crt.pem Commands to generate Server Certificate: openssl genrsa -out cert-key2.pem 4096 openssl req -new -sha256 -subj "/CN=test-domain1.local" -key cert-key2.pem -out cert2.csr echo "subjectAltName=DNS:test-domain1.local" >> extfile.cnf openssl x509 -req -sha256 -days 501 -in cert2.csr -CA root-crt.pem -CAkey root-key.pem -out cert2.pem -extfile extfile.cnf -CAcreateserial Note: Add the TLS Certificate to XC console, create a LB(HTTP/TCP) and attach origin pools and TLS certificates to it. In Ubuntu: Move above created CA certificate (ca-crt.pem) to /usr/local/share/ca-certificates/ca-crt.pem and modify "/etc/hosts" file by mapping the VIP(you can get this from your configured LB -> DNS info -> IP Addr) with domain, in this case the (test-domain1.local). mTLS with HTTPS Custom Certificate Log in the F5 Distributed Cloud Console and navigate to “Web APP & API Protection” module. Go to Load Balancers and Click on ‘Add HTTP Load Balancer’. Give the LB Name (test-mtls-cust-cert), Domain name (mtlscusttest.f5-hyd-demo.com), LB Type as HTTPS with Custom Certificate, Select the TLS configuration as Single Certificate and configure the certificate details. Click in ‘Add Item’ under TLS Certificates and upload the cert and key files by clicking on import from files. Click on apply and enable the mutual TLS, import the root cert info, and add the XFCC header value. Configure the origin pool by clicking on ‘Add Item’ under Origins. Select the created origin pool for httpbin. Click on ‘Apply’ and then save the LB configuration with ‘Save and Exit’. Now, we have created the Load Balancer with mTLS parameters. Let us verify the same with the origin server. mTLS with HTTPS with Automatic Certificate Log in the F5 Distributed Cloud Console and navigate to “Web APP & API Protection” module. Goto Load Balancers and Click on ‘Add HTTP Load Balancer’. Give the LB Name(mtls-auto-cert), Domain name (mtlstest.f5-hyd-demo.com), LB Type as HTTPS with Automatic Certificate, enable the mutual TLS and add the root certificate. Also, enable x-forwarded-client-cert header to add the parameters. Configure the origin pool by clicking on ‘Add Item’ under Origins. Select the created origin pool for httpbin. Click on ‘Apply’ and then save the LB configuration with ‘Save and Exit’. Now, we have created the HTTPS Auto Cert Load Balancer with mTLS parameters. Let us verify the same with the origin server. Conclusion As you can see from the demonstration, F5 Distributed Cloud WAF is providing the additional security to the origin servers by forwarding the client certificate info using mTLS XFCC header. Reference Links mTLS Insights Create root cert pair F5 Distributed Cloud WAF1.8KViews2likes0CommentsAutomation of OWASP Injection mitigation using F5 Distributed Cloud Platform
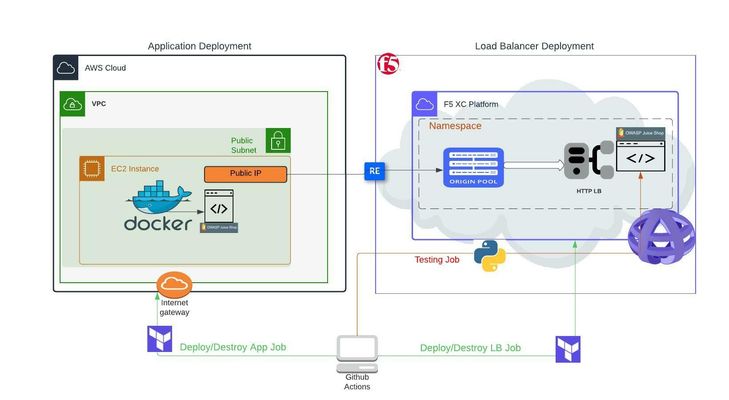
Objective: The purpose of this article is to automate F5 Distributed Cloud Platform (F5 XC) detection and mitigation of OWASP TOP 10 Injection attacks and integrating code in GitHub. This article shows how we can use Terraform, Python and Github workflow to provide the flexibility of updating existing infrastructure after every change using CI/CD event triggers. For more details about this feature please refer: Injection Attack Mitgation Article Introduction to Injection: An application is vulnerable to attack when: The data provided is not validated by the application User requested schema is not being analyzed before processing Data is used within search parameters to extract additional and sensitive records If a user tries to use Cross-site Scripting to get some unauthorized data Some of the common injections are SQL, NoSQL, OS command, Object Relational Mapping (ORM), Etc. In this automation article we are trying to bypass password validation in a demo application using SQL Injection code. Design: For the purpose of reusability, I have separated demo application and F5 XC resources deployments in 2 different flows as below. 1. First, we are deploying a demo application (Juice Shop) as a docker container in AWS EC2 machine (if customer already has their application running, they can skip this and use their application public IP directly in below flow) 2. Once the demo app is deployed, we are using application public IP to configure the origin pool, WAF and load balancer in F5 XC Once demo application and F5 XC resources are deployed successfully, python script is generating login request consisting of malicious SQL Injection. Once traffic is generated, F5 XC platform WAF will detect and block the malicious request. Finally, we are destroying the above resources using terraform Above workflow is integrated using GitHub Actions file which ensures dynamic deployment of the demo app and F5 XC load balancer which can be exposed using public domain name. Repo code URL:https://github.com/f5devcentral/owasp-injection-mitigation Conclusion: In this article we have showed how we can leverage power of CI/CD deployment to automate end to end verification of injection attacks mitigationusing GitHub Actions, Terraform and Python developed in a generic way where users can bring up the complete setup within a few clicks. For further information check the links below: F5 Distributed Cloud Platform (Link) F5 Distributed Cloud WAF Overview (Link) OWASP Injection Attacks (Link)1.9KViews2likes0Comments